July 2016 Update.
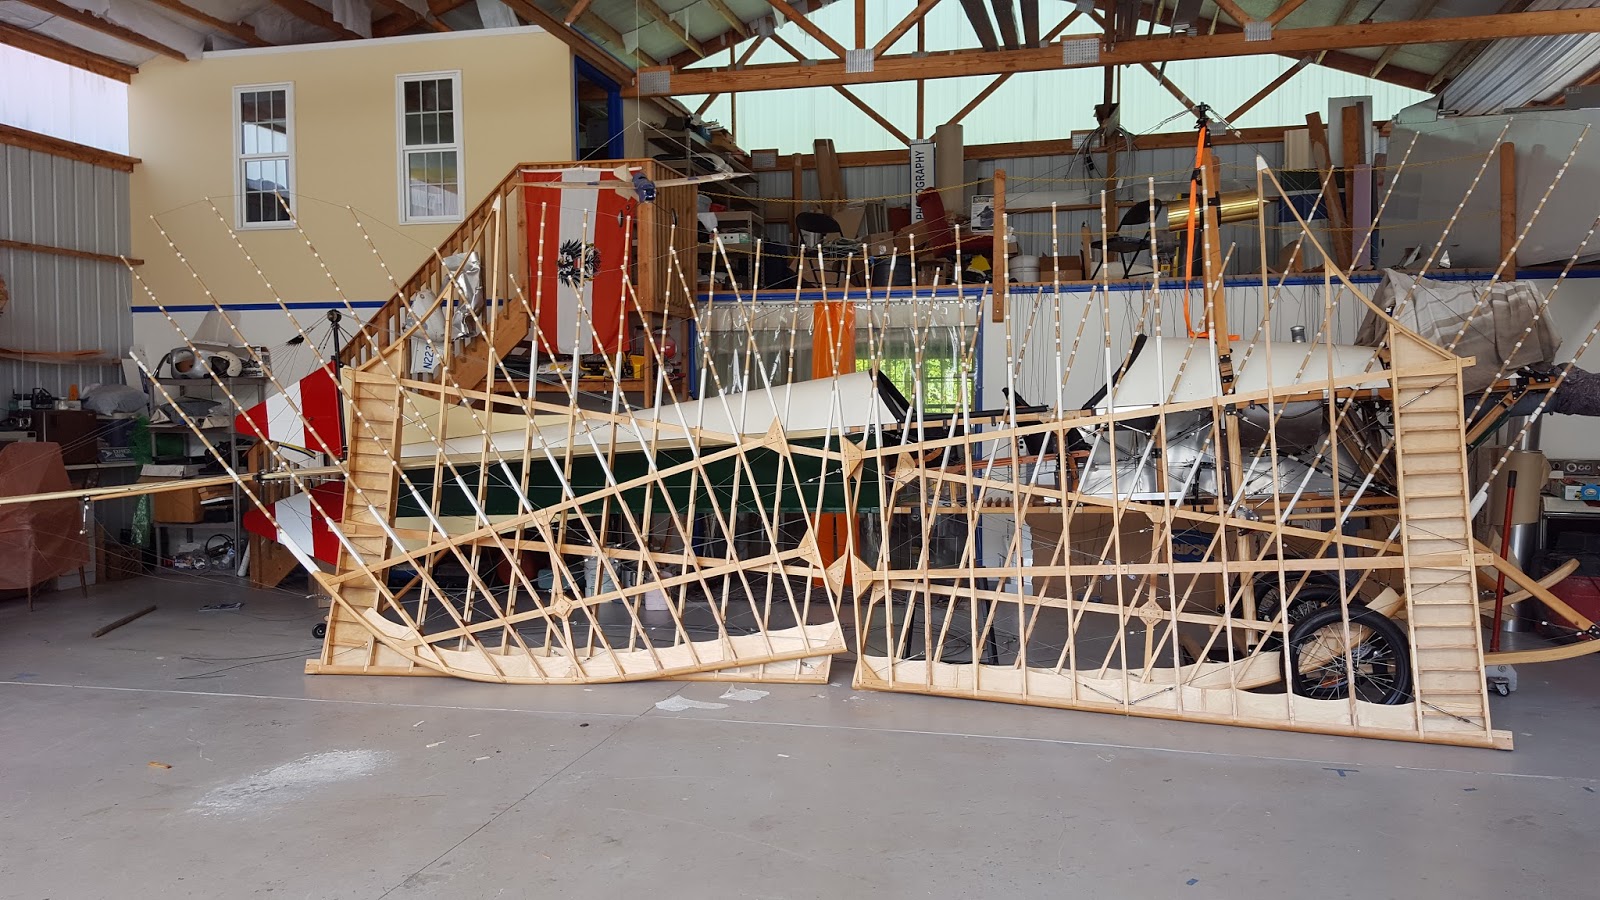
It's actually February 2017 as I am writing this blog, but I had to break it into meaningful chapters and this is one important one completed. Basic wing structures are completed, fitted, brace wiring done, bamboo extensions installed, fittings made. 90% done, 90% to go. Just cover and fly ?
Building the wings
I initially expected the wings to be a simple process, after all, I had drawings and materials were straight forward. Sitka spruce, 4130 chrome moly, the wires and turnbuckles, covering materials. Nothing new here. Right?
WRONG.
Turns out that the drawings were woefully inadequate, primarily they did not adequately show the twist of the wings. Seems that 5 degrees washout appears correct, plus another 2 degrees at the tips. That was made evident after studying many photos and sketches. Plans were not revealing. Plus mine would be made in 2 inner and two outer panels, hinged where they joined to provide folding in order to bring their overall size down to a manageable dimension, but creating yet another challenge. My hangar is 45 foot wide ( outside dimension ) and the wingspan is 47 foot.
Building the wing structures actually turned out to be a two year project. I was able to work in my heated workshop- up to the point of installing the bamboo extensions - or I would not be able to get them out of the shop. Boat in the basement syndrome. The setup was complicated, getting the twist and everything correct, with two separate panels. Here goes:
 |
So this is what I had to work with
|
 |
Translated into black on white, much better
 |
Root Rib profile, thanks Heinz.
|
|
 |
Translating onto fixture board
|
All the main components needed to be fabricated first
 |
Getting the radius for the tip bows figured out
|
 |
Bending and gluing the tip bow strips in a fixture, after steaming
|
 |
Making # 13 ribs, where the folding hinges will be installed
|
 |
Rib 13 in place
|
 |
my indoor-outdoor saw mill
|
 |
Wing tip bows completed
|
 |
10 to 1 taper jig and cut
|
 |
Joining to leading edge
|
 |
Planning never to come apart
|
 |
Gluing several spars at the same time
|
 |
My poor man's glue curing oven during cold weather
|
 |
Each spar is made of two laminates, total of 12 spars.
|
 |
Notching the leading edge for the rib caps
|
 |
Homemade router jig
|
 |
getting the angles set up, note the twist
|
 |
Starting to lay out the spars
|
 |
Fitting the spars
|
 |
Corner blocks and gussets
|
 |
Note the washout
|
 |
Rib 13, where inner and outer panels meet
|
 |
One of the 6 hinges, one per spar
|
 |
Hinges in place
|
 |
folding trial
|
 |
One of the bracing fittings
|
 |
Fitting the fitting
|
 |
Cross bracing each panel
|
 |
Using a laser to get it nice and true. ( Overkill )
|
 |
Miles of Sitka spruce rib cap strips
|
 |
Cap strips installed
|
 |
Lots of stiffener blocks installed, each one different
|
 |
Seemingly hundreds of stiffener gussets, each one needs to be individually fitted
|
 |
.. and glued into place
|
 |
That's where a lot of time goes
|
 |
My poor man's steamer, works like a charm
|
 |
Just add wood.. and steam away
|
 |
Then place in fixture, let dry, next day glue together in same fixture.
|
 |
Temporarily fit bow at inboard end of wing for later assembly
|
 |
Install scalloped leading edge plywood and wing walk stiffeners
|
 |
Remove and varnish 2 coats
|
 |
Lay out and admire
|
 |
Making all the pieces for the bridge out of laminated ash
|
 |
All the fittings needed for the bridge and folding mechanism
|
 |
For one wing, after sandblasting, and powder coating
|
 |
Some of the fittings for the 49 wires , two of each
|
 |
Fitting the left inner panel onto the fuselage
|
 |
Then the right
|
 |
Then both
|
 |
Starting the bridge and folding system, left side
|
 |
Same shot, from the front. Still snow on the runway
|
 |
Bridge and bracing wires and washout trimming
|

 |
Note the aluminum angles clamped to the underside of the wing, to allow digital level to be used to get the washout correct
|
 |
Getting cramped already
|
 |
Leading edge hinge and bracing wires and fittings, to get the wires right
|
 |
Bridge junction at station 13 for folding mechanism
|
 |
Fun building this junction, where the outrigger wheel will mount
|
 |
Designing all the 49 wires for each wing and their fittings
|
 |
Yes, 49 different wires, each side
|
 |
Not done yet, now come the bamboo extensions, each one gets fitted with at least a half dozen wood wedges, glued and then taped. I am using cloth tape, excellent stuff.
|
 |
Very solid
|
 |
The outer panels almost double in size
|

|
Tip wire gets installed and secured with copper wire and soldered
|
 |
Time to inspect
|
 |
and admire some more
|
So this is where I am in July 2016. 90% done, 90% to go.


